

Why You’ll Love This Christmas Tree Cheese Ball
If you’re searching for a show-stopping appetizer that will have your guests talking well into the New Year, this Christmas Tree Cheese Ball is exactly what you need. Trust me, I’ve brought this to countless holiday gatherings, and it disappears faster than snow on a sunny day. The best part? It looks impressive but comes together with minimal effort.
Here’s why this festive Christmas cheese tree deserves a spot on your holiday table:
- Ease of preparation: With just 10 minutes of active prep time, you can have this appetizer ready before you can say “Jingle Bells.” The chilling time does all the work for you, firming up the mixture so it holds its shape beautifully. No cooking required!
- Make-ahead friendly: This easy holiday cheese ball appetizer can be prepared up to a month in advance and frozen. Simply thaw, decorate, and serve. Perfect for busy hosts who want to enjoy their own parties.
- Versatility: Whether you’re feeding a crowd of 10 or hosting an intimate gathering, this recipe adapts easily. Make one large tree or two smaller ones. Plus, the decorations can be customized based on preferences and dietary needs.
- Distinctive flavor: The combination of sharp cheddar and cream cheese creates a rich, tangy base, while the grated onion, dry mustard, and red pepper sauce add layers of savory goodness. It’s creamy, slightly sharp, and utterly addictive.
And let’s be honest, anything shaped like a Christmas tree automatically makes it 100% more festive. Your guests will be reaching for their phones to snap a picture before they even grab a cracker.
Jump to:
- Why You’ll Love This Christmas Tree Cheese Ball
- Essential Ingredients for Christmas Tree Cheese Ball
- Main Ingredients
- Decoration and Serving Ingredients
- Special Dietary Options
- How to Prepare the Perfect Christmas Tree Cheese Ball: Step-by-Step Guide
- First Step: Mix Your Base
- Second Step: Chill and Divide
- Third Step: Shape Your Tree
- Fourth Step: Add the Greenery
- Fifth Step: Decorate Your Tree
- Final Step: Add the Star and Serve
- Quick Reference Table
- Protein and Main Component Alternatives
- Cheese Substitutions
- Base Alternatives
- Adding Protein Mix-ins
- Vegetable, Sauce, and Seasoning Modifications
- Vegetable Additions and Swaps
- Sauce and Seasoning Variations
- Decoration Alternatives
- Mastering Christmas Tree Cheese Ball: Advanced Tips and Variations
- Pro Cooking Techniques
- Flavor Variations
- Presentation Tips
- Make-Ahead Options
- How to Store Christmas Tree Cheese Ball: Best Practices
- Refrigeration Guidelines
- Freezing Instructions
- Serving After Storage
- FAQs: Frequently Asked Questions About Christmas Tree Cheese Ball
- What is a Christmas tree cheese ball recipe?
- How do you shape a cheese ball into a Christmas tree?
- Can you make a nut-free Christmas tree cheese ball for allergies?
- Can you freeze a Christmas tree cheese ball?
- How do you make the cheese star stay on a Christmas tree cheese ball?
- Christmas Tree Cheese Ball
- Ingredients
- Instructions
- Last Step:
- Notes
- Nutrition
- Did you make this recipe?
Essential Ingredients for Christmas Tree Cheese Ball
Creating the perfect Christmas tree shaped cheese ball starts with quality ingredients. Each component plays a crucial role in building that creamy, flavorful base and stunning presentation. Here’s everything you’ll need:
Main Ingredients
- 3 packages (8 ounces each) cream cheese, softened – The foundation of your cheese ball. Make sure it’s fully softened for smooth, lump-free mixing. This gives the appetizer its signature creamy texture.
- 4 cups shredded sharp cheddar cheese (16 ounces) – Provides the bold, tangy flavor that makes this cheese ball recipe memorable. Sharp cheddar has more character than mild varieties.
- 2 tablespoons grated onion – Adds a subtle savory depth without overpowering the cheese. Freshly grated works best for even distribution.
- 1/2 teaspoon dry ground mustard – Enhances the cheese flavor and adds a warm, slightly tangy note that brings all the flavors together.
- 5 or 6 drops red pepper sauce – Just enough to add a tiny kick without making it spicy. This is your generic hot sauce, nothing fancy required.
Decoration and Serving Ingredients
- 1 cup finely chopped parsley – Creates the beautiful green “tree” appearance. Fresh parsley works best for vibrant color.
- 1/2 cup pine nuts – These act as your garland, adding a lovely crunch and nutty flavor that complements the cheese.
- 1/4 cup chopped red bell pepper (or yellow) – Your ornaments! These add pops of festive color and a sweet crunch.
- Assorted crackers for serving – Choose sturdy varieties that can handle scooping unless you’re providing spreaders.
- Optional: cheddar cheese slice or lemon peel for star – The crowning touch for your tree. Cut into a star shape for maximum impact.
Special Dietary Options
Good news for those with dietary restrictions! This holiday cheese ball can easily be adapted:
- Nut-free: Replace pine nuts with pecan halves, extra bell peppers, or pomegranate seeds for the garland effect.
- Gluten-free: Simply serve with gluten-free crackers. The cheese ball itself contains no gluten.
- Lower calorie: Use reduced-fat cream cheese and cheddar, though the texture may be slightly softer.
Pro Tip: Always bring your cream cheese to room temperature before mixing. Cold cream cheese creates lumps, and nobody wants a lumpy Christmas tree!
How to Prepare the Perfect Christmas Tree Cheese Ball: Step-by-Step Guide
Making this Christmas tree cheese ball recipe is surprisingly simple. Follow these steps, and you’ll have a stunning appetizer that looks like it came from a gourmet kitchen.
First Step: Mix Your Base
In a large mixing bowl, combine the softened cream cheese, shredded sharp cheddar cheese, grated onion, dry ground mustard, and red pepper sauce. Using a hand mixer or stand mixer, beat everything together until well combined and smooth. This usually takes about 2-3 minutes. You want a uniform mixture with no streaks of white cream cheese showing.
The key here is patience. If your cream cheese isn’t fully softened, you’ll end up with chunks. If you’re short on time, you can microwave the cream cheese in 15-second intervals, flipping it over each time, until it reaches spreading consistency.
Second Step: Chill and Divide
Decide whether you’re making one impressive large tree or two smaller ones. For a big party, one large tree makes a statement. If you’re feeding a smaller crowd or want to save some for later, divide the mixture in half.
Cover the bowl with plastic wrap and refrigerate until the mixture is firm enough to hold its shape. This typically takes 30-50 minutes, depending on how warm your kitchen is. You should be able to scoop the mixture without it immediately losing form.
Third Step: Shape Your Tree
Place your chilled cheese mixture on a cookie sheet or serving platter lined with parchment paper. Using your hands, shape the mixture into a cone shape. Start with a wide base and taper toward the top, just like a real Christmas tree. Don’t worry about making it perfect; rustic charm is part of the appeal.
If the mixture sticks to your hands, lightly coat them with cooking spray or a tiny bit of olive oil. Work quickly but gently, and remember that any imperfections will be covered by parsley anyway.
Fourth Step: Add the Greenery
Pour your finely chopped parsley onto a plate or shallow dish. Carefully roll your shaped tree in the parsley, pressing gently to help it adhere. Don’t be shy here; you want full coverage for that festive green look. Pay special attention to the tip and base areas.
If some spots are patchy, simply sprinkle extra parsley over them and press gently. The parsley coating also helps hide any fingerprint marks from shaping.
Fifth Step: Decorate Your Tree
Now comes the fun part! Press your pine nuts onto the tree in a swirling or zigzag pattern to resemble garland. You can create one continuous strand or multiple smaller ones winding around the tree.
Next, press your chopped bell pepper pieces onto the tree as ornaments. Distribute them evenly for a balanced look, or cluster them for a more whimsical appearance. This is where you can get creative!
Final Step: Add the Star and Serve
Cut a star shape from a slice of cheddar cheese or lemon peel. You can use a small star-shaped cookie cutter or carefully cut it freehand with a knife. Place the star on top of your tree. If it won’t stay put, insert a toothpick into the star and gently push it into the top of the cheese tree.
Transfer your masterpiece to a serving platter if you haven’t already, surround it with assorted crackers, and watch your guests’ faces light up. For more make-ahead appetizer inspiration, check out these health benefits of cheese that make this indulgence even better.
Quick Reference Table
| Step | Action | Time Required |
|---|---|---|
| 1 | Mix ingredients | 5 minutes |
| 2 | Chill mixture | 30-50 minutes |
| 3 | Shape into cone | 3-5 minutes |
| 4 | Roll in parsley | 2 minutes |
| 5 | Add decorations | 3-5 minutes |
| 6 | Top with star and serve | 1-2 minutes |
Protein and Main Component Alternatives
While the classic Christmas Tree Cheese Ball uses cream cheese and sharp cheddar as its base, there are plenty of ways to switch things up based on your preferences or what you have on hand. Let’s look at some delicious alternatives.
Cheese Substitutions
The sharp cheddar in this recipe provides that distinctive tang, but you can easily swap it for other cheeses:
- Extra sharp cheddar: For an even bolder flavor punch that stands up to the other ingredients.
- White cheddar: Creates a milder, creamier taste with a different color profile.
- Pepper jack: Adds extra heat and a fun flecked appearance. Great for spice lovers!
- Swiss cheese: Provides a nutty, sweet flavor that pairs beautifully with the onion.
- Blue cheese crumbles: Fold these in for an elegant, sophisticated flavor variation.
Keep in mind that harder cheeses will create a firmer cheese ball, while softer cheeses may need longer chilling time.
Base Alternatives
The cream cheese base can also be modified:
- Goat cheese: Substitute half the cream cheese with goat cheese for a tangy, sophisticated twist.
- Brie: Remove the rind and blend softened brie for an ultra-rich, buttery texture.
- Mascarpone: Creates an incredibly creamy, mild base that lets other flavors shine.
Adding Protein Mix-ins
Want to make your cheese tree heartier? Try folding in these protein additions:
- Crispy bacon bits: About 1/2 cup adds smoky, savory depth.
- Chopped pepperoni: Creates a pizza-inspired flavor profile.
- Smoked salmon: Finely chopped for an elegant appetizer variation.
- Crab meat: Makes this appetizer feel extra special for holiday gatherings.
Remember: When adding mix-ins, incorporate them after blending the cheese base. Gently fold them in to maintain texture and ensure even distribution throughout your tree.
Vegetable, Sauce, and Seasoning Modifications
The beauty of a holiday cheese ball is its adaptability. Whether you’re accommodating picky eaters, dietary restrictions, or simply want to try something new, there are countless ways to customize this recipe.
Vegetable Additions and Swaps
The grated onion in the base provides subtle flavor, but you can expand the vegetable profile:
- Minced garlic: Add 1-2 cloves for a garlic lover’s version.
- Finely diced jalapeños: For those who like heat, add 1-2 tablespoons, seeds removed.
- Sun-dried tomatoes: Finely chopped, they add intense umami flavor.
- Chopped olives: Kalamata or green olives bring briny depth.
- Caramelized onions: Replace raw onion with 1/4 cup for sweeter, complex flavor.
Sauce and Seasoning Variations
Beyond the red pepper sauce, consider these flavor boosters:
- Worcestershire sauce: Add 1-2 teaspoons for deeper savory notes.
- Hot sauce varieties: Sriracha adds garlic notes, while chipotle brings smokiness.
- Everything bagel seasoning: Mix in 1 tablespoon for a trendy flavor twist.
- Fresh herbs: Chopped chives, dill, or thyme add bright, fresh notes.
- Smoked paprika: A pinch adds warmth and beautiful color.
Decoration Alternatives
Your Christmas cheese tree for parties doesn’t have to follow the traditional decoration script. Get creative with these options:
- Pomegranate seeds: Beautiful red “ornaments” with a sweet-tart pop.
- Dried cranberries: Festive red color with chewy texture.
- Chopped pecans or walnuts: Alternative to pine nuts with great crunch.
- Thin pretzel sticks: Arrange as “branches” for a unique look.
- Edible glitter: For a truly magical, shimmering tree.
And if you’re looking for the perfect sweet treat to follow this savory appetizer, try these decadent cheesecake lemon bars that balance richness with citrus brightness.
Mastering Christmas Tree Cheese Ball: Advanced Tips and Variations
Ready to take your cheese tree to the next level? These pro tips and creative variations will help you create an appetizer that’s truly memorable.
Pro Cooking Techniques
The difference between a good cheese ball and a great one often comes down to technique:
- Temperature matters: Work with room-temperature cream cheese for the smoothest base, but chilled mixture for the easiest shaping.
- Use parchment paper: Shape your tree on parchment for easy transfer and cleanup.
- Chill between steps: If your tree starts getting soft while decorating, pop it back in the fridge for 10 minutes.
- Wet your hands: Lightly damp hands prevent sticking when shaping the cheese mixture.
Flavor Variations
Transform your Christmas tree cheese ball with these themed variations:
The Everything Tree: Mix everything bagel seasoning into the base and top with additional seasoning. Skip the parsley and roll in more everything seasoning for a unique look.
The Southwest Tree: Add 1 teaspoon cumin and 1 teaspoon chili powder to the base. Use cilantro instead of parsley, and decorate with diced red peppers and corn.
The Mediterranean Tree: Mix in sun-dried tomatoes, chopped kalamata olives, and oregano. Roll in a mix of parsley and basil, and top with feta crumbles.
The Buffalo Chicken Tree: Add 1/2 cup cooked, shredded chicken and 2 tablespoons buffalo sauce to the base. Roll in celery leaves and top with blue cheese crumbles.
Presentation Tips
How you present your cheese tree makes all the difference:
- Use a festive platter: A red or green serving dish amplifies the holiday theme.
- Create height: Elevate your tree on a cake stand for a dramatic centerpiece.
- Surround with elements: Scatter extra pine nuts and bell pepper pieces around the base.
- Add lights: Battery-operated string lights around the platter create a magical glow.
Make-Ahead Options
For stress-free entertaining, prepare components in advance:
- Cheese base: Can be made and refrigerated up to 3 days before shaping.
- Shaped tree: Freeze undecorated for up to 1 month. Thaw overnight in the refrigerator before decorating.
- Decorations: Chop parsley and vegetables up to 1 day ahead; store separately in airtight containers.
- Full assembly: The decorated tree can be refrigerated for 2-3 hours before serving, though the parsley may darken slightly.
How to Store Christmas Tree Cheese Ball: Best Practices
Proper storage ensures your Christmas Tree Cheese Ball stays fresh and delicious whether you’re saving leftovers or prepping ahead.
Refrigeration Guidelines
For short-term storage, your cheese ball keeps beautifully in the refrigerator:
- Cover tightly with plastic wrap, pressing it directly against the surface to prevent air exposure.
- Store in an airtight container if you have one large enough.
- Properly stored, your cheese ball will stay fresh for 3-4 days in the refrigerator.
- Note: The parsley coating may darken slightly over time, but the flavor remains delicious.
Freezing Instructions
Yes, you can absolutely freeze this cheese ball! Here’s how:
- Shape the cheese mixture into your tree form but do not add decorations.
- Wrap tightly in plastic wrap, ensuring no air pockets.
- Wrap again in aluminum foil for extra protection against freezer burn.
- Place in a freezer bag labeled with the date.
- Freeze for up to 1 month.
When you’re ready to serve, thaw the cheese tree in the refrigerator for about 24 hours. Once thawed, roll in fresh parsley and add your decorations. This make-ahead approach is perfect for busy holiday schedules.
Serving After Storage
If you’ve refrigerated or frozen your cheese ball, you might notice it’s quite firm when first brought out:
- Allow 20-30 minutes at room temperature before serving for easier spreading.
- A sharp knife can be used to cut portions if spreading is difficult.
- If the cheese ball was frozen, the texture may be slightly softer after thawing; a brief chill after decorating helps firm it back up.
For more information on the best make-ahead Christmas appetizers, check out these expert tips from Food52.

FAQs: Frequently Asked Questions About Christmas Tree Cheese Ball
What is a Christmas tree cheese ball recipe?
How do you shape a cheese ball into a Christmas tree?
Can you make a nut-free Christmas tree cheese ball for allergies?
Can you freeze a Christmas tree cheese ball?
How do you make the cheese star stay on a Christmas tree cheese ball?
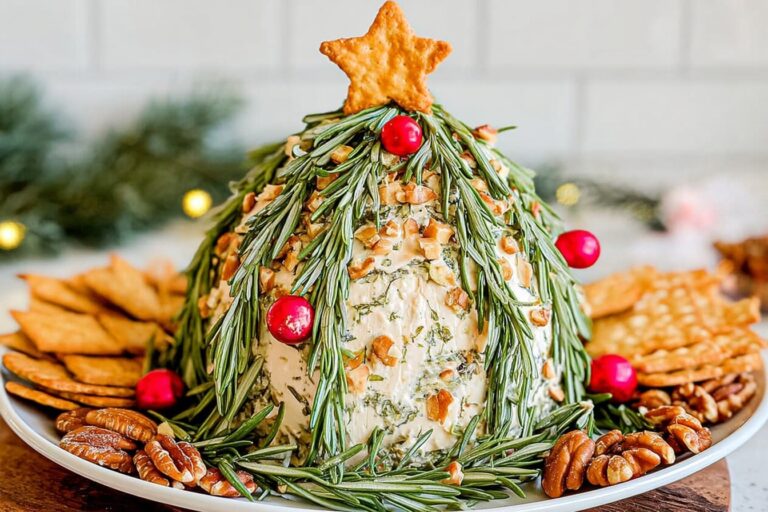
Christmas Tree Cheese Ball
🎄 Impress guests with a stunning Christmas cheese tree that’s the centerpiece of any holiday gathering!
🧀 Creamy, savory cheese ball easy to make ahead and customize for festive fun!
- Total Time: 1 hour
- Yield: 10 servings
Ingredients
– 3 packages (8 ounces each) cream cheese, softened
– 4 cups shredded sharp cheddar cheese (16 ounces)
– 2 tablespoons grated onion
– 1/2 teaspoon dry ground mustard
– 5 or 6 drops red pepper sauce
– 1 cup finely chopped parsley
– 1/2 cup pine nuts
– 1/4 cup chopped red bell pepper (or yellow)
– Assorted crackers for serving
– Optional: cheddar cheese slice or lemon peel for star
Instructions
1-First Step: Mix Your Base In a large mixing bowl, combine the softened cream cheese, shredded sharp cheddar cheese, grated onion, dry ground mustard, and red pepper sauce. Using a hand mixer or stand mixer, beat everything together until well combined and smooth. This usually takes about 2-3 minutes. You want a uniform mixture with no streaks of white cream cheese showing. The key here is patience. If your cream cheese isn’t fully softened, you’ll end up with chunks. If you’re short on time, you can microwave the cream cheese in 15-second intervals, flipping it over each time, until it reaches spreading consistency.
2-Second Step: Chill and Divide Decide whether you’re making one impressive large tree or two smaller ones. For a big party, one large tree makes a statement. If you’re feeding a smaller crowd or want to save some for later, divide the mixture in half. Cover the bowl with plastic wrap and refrigerate until the mixture is firm enough to hold its shape. This typically takes 30-50 minutes, depending on how warm your kitchen is. You should be able to scoop the mixture without it immediately losing form.
3-Third Step: Shape Your Tree Place your chilled cheese mixture on a cookie sheet or serving platter lined with parchment paper. Using your hands, shape the mixture into a cone shape. Start with a wide base and taper toward the top, just like a real Christmas tree. Don’t worry about making it perfect; rustic charm is part of the appeal. If the mixture sticks to your hands, lightly coat them with cooking spray or a tiny bit of olive oil. Work quickly but gently, and remember that any imperfections will be covered by parsley anyway.
4-Fourth Step: Add the Greenery Pour your finely chopped parsley onto a plate or shallow dish. Carefully roll your shaped tree in the parsley, pressing gently to help it adhere. Don’t be shy here; you want full coverage for that festive green look. Pay special attention to the tip and base areas. If some spots are patchy, simply sprinkle extra parsley over them and press gently. The parsley coating also helps hide any fingerprint marks from shaping.
5-Fifth Step: Decorate Your Tree Now comes the fun part! Press your pine nuts onto the tree in a swirling or zigzag pattern to resemble garland. You can create one continuous strand or multiple smaller ones winding around the tree. Next, press your chopped bell pepper pieces onto the tree as ornaments. Distribute them evenly for a balanced look, or cluster them for a more whimsical appearance. This is where you can get creative!
6-Final Step: Add the Star and Serve Cut a star shape from a slice of cheddar cheese or lemon peel. You can use a small star-shaped cookie cutter or carefully cut it freehand with a knife. Place the star on top of your tree. If it won’t stay put, insert a toothpick into the star and gently push it into the top of the cheese tree. Transfer your masterpiece to a serving platter if you haven’t already, surround it with assorted crackers, and watch your guests’ faces light up. For more make-ahead appetizer inspiration, check out these health benefits of cheese that make this indulgence even better.
Last Step:
Please leave a rating and comment letting us know how you liked this recipe! This helps our business to thrive and continue providing free, high-quality recipes for you.Notes
🧊 Make ahead: shape cheese and freeze for up to one month; thaw before decorating.
🌰 Substitute pine nuts with pecan halves or pomegranate seeds for nut allergies.
✨ Use a toothpick to secure the star topper for stability.
- Prep Time: 10 minutes
- Chill: 50 minutes
- Category: Appetizer
- Method: No Bake
- Cuisine: American
- Diet: Vegetarian
Nutrition
- Serving Size: 1 serving
- Calories: 350 kcal
- Sugar: 2 g
- Sodium: 450 mg
- Fat: 30 g
- Saturated Fat: 18 g
- Unsaturated Fat: 10 g
- Trans Fat: 0 g
- Carbohydrates: 5 g
- Fiber: 1 g
- Protein: 12 g
- Cholesterol: 90 mg





