

Why You’ll Love This Simple No Bake Banana Pudding
If you want a dessert that tastes like a family favorite and comes together fast, this Simple No Bake Banana Pudding is a keeper. It is creamy, comforting, and perfect for warm days when you do not want to turn on the oven. The mix of sweet bananas, soft vanilla wafers, and fluffy whipped topping makes every bite feel familiar and satisfying.
- Easy to make: This no bake banana pudding comes together in about 15 to 20 minutes of active prep time. You only need a bowl, a whisk, and a dish for layering, which makes it a great choice for busy parents, students, and working professionals.
- Light and refreshing: Bananas add natural sweetness and a soft texture, while the cold pudding mixture feels cool and smooth. According to the health benefits of bananas, bananas also bring potassium and other helpful nutrients to the table.
- Flexible for many kitchens: This simple no bake banana pudding can fit different needs. You can use whole milk for a richer result, 2% milk for a lighter version, or swap in dairy free whipped topping if needed. It is a nice dessert for home cooks who want something simple and friendly.
- Classic flavor: The combination of instant vanilla pudding, bananas, and vanilla wafers gives this dessert the cozy taste people love in a no bake banana pudding. It is creamy, sweet, and soft with just the right amount of cookie texture.
This is the kind of dessert I like to bring to a family dinner because it feels special without asking for much work.
If you enjoy easy dessert recipes like this one, you may also like our no bake energy bites for a quick make-ahead snack or our mango peach strawberry smoothie for a cool and fruity treat.
Jump to:
- Why You’ll Love This Simple No Bake Banana Pudding
- Essential Ingredients for Simple No Bake Banana Pudding
- Main Ingredients
- Ingredient Notes
- Special Dietary Options
- How to Prepare the Perfect Simple No Bake Banana Pudding: Step-by-Step Guide
- First Step: Gather and chill your ingredients
- Second Step: Mix the pudding base
- Third Step: Fold in the whipped topping
- Fourth Step: Build the first layer
- Fifth Step: Add more pudding and repeat the layers
- Sixth Step: Add the final toppings
- Final Step: Chill before serving
- Protein and Main Component Alternatives
- Simple swaps for the pudding base
- Whipped topping alternatives
- Milk alternatives
- Cookie alternatives
- Vegetable, Sauce, and Seasoning Modifications
- Flavor additions
- Fruit variations
- Sauce ideas
- Seasoning tips
- Mastering Simple No Bake Banana Pudding: Advanced Tips and Variations
- Pro cooking techniques
- Flavor variations
- Presentation tips
- Make-ahead options
- How to Store Simple No Bake Banana Pudding: Best Practices
- Refrigeration
- Freezing
- Reheating
- Meal prep considerations
- FAQs: Frequently Asked Questions About Simple No Bake Banana Pudding
- How much milk do I need for no bake banana pudding?
- What kind of pudding mix is best for no bake banana pudding?
- How many bananas do I need for simple no bake banana pudding?
- Can I make no bake banana pudding ahead of time?
- How long to chill no bake banana pudding and what cookies to use?
- Simple No Bake Banana Pudding
- Ingredients
- Instructions
- Last Step:
- Notes
- Nutrition
- Did you make this recipe?
Essential Ingredients for Simple No Bake Banana Pudding
To make this simple no bake banana pudding, gather everything before you start. That makes the layering process quick and smooth, especially if you are making dessert while helping with homework, packing lunch, or getting ready for guests.
Main Ingredients
- 5.1 ounces instant vanilla pudding mix – This creates the creamy base for the pudding and sets quickly without cooking.
- 3 cups cold milk – Cold milk helps the pudding thicken properly and keeps the texture smooth.
- 3 large bananas thinly sliced or 4 medium bananas – These add fresh banana flavor and make the classic layers that define no bake banana pudding.
- 8 ounces whipped topping – This makes the pudding light, fluffy, and extra creamy. Thawed whipped topping blends in easily.
- 1 box vanilla wafer cookies – These cookies soften as the dessert chills and bring the signature cookie layer everyone expects.
- Additional bananas for garnish if desired – A few extra banana slices on top make the dessert look pretty and fresh.
Ingredient Notes
The best bananas are yellow with a few brown spots. They should be ripe enough for sweetness but not so soft that they fall apart. Use instant pudding, not cook and serve pudding, because this is a true no bake banana pudding and the mix needs to set with cold milk alone.
If you want a more old fashioned feel, many readers enjoy pairing this dessert with a butter cookie style wafer. For a flavor closer to classic Southern pudding, you can keep the vanilla wafers simple and let the bananas shine.
Special Dietary Options
- Vegan: Use plant based milk, a dairy free instant pudding mix, and coconut whipped topping. Choose vegan vanilla cookies if available.
- Gluten free: Use gluten free vanilla cookies or gluten free wafer style cookies. Check the pudding mix label for gluten free status.
- Low calorie: Use reduced fat milk, light whipped topping, and a lighter cookie option. You can also serve smaller portions in cups.
| Ingredient | Amount | Purpose |
|---|---|---|
| Instant vanilla pudding mix | 5.1 ounces | Builds the creamy pudding base |
| Cold milk | 3 cups | Helps the pudding set smoothly |
| Bananas | 3 large or 4 medium | Adds fresh flavor and soft layers |
| Whipped topping | 8 ounces | Makes the dessert fluffy and light |
| Vanilla wafer cookies | 1 box | Creates the classic cookie layer |
How to Prepare the Perfect Simple No Bake Banana Pudding: Step-by-Step Guide
First Step: Gather and chill your ingredients
Start by placing your 3 cups of cold milk in the refrigerator if it is not already cold. Cold milk matters because instant pudding thickens best when it is straight from the fridge. Slice your bananas right before layering so they stay fresh and bright. Also, let your whipped topping thaw if it is frozen, since it will fold into the pudding more smoothly when soft.
Set out a large mixing bowl, a whisk, and a 9×13-inch dish or a trifle bowl. If you are feeding a smaller group, you can use individual dessert cups instead. This simple no bake banana pudding works well for casual family meals, church gatherings, potlucks, and even late night study breaks.
Second Step: Mix the pudding base
In a large bowl, whisk together the 5.1 ounces of instant vanilla pudding mix and 3 cups of cold milk for about 2 minutes. Keep whisking until the mixture begins to thicken. The texture should look smooth and creamy, not watery. If you are using a stand mixer, keep the speed low so you do not splash the milk.
For the best result, do not use warm milk. Warm milk can make the pudding less smooth and may keep it from setting the right way. If you want a lighter dessert, you can use 2% milk, though whole milk gives the richest flavor. This step is the heart of the simple no bake banana pudding, so take a minute to whisk until everything looks silky.
Third Step: Fold in the whipped topping
Once the pudding has started to thicken, gently fold in the 8 ounces of whipped topping. Use a spatula and move slowly from the bottom of the bowl upward. The goal is to keep as much air in the mixture as possible so the pudding stays fluffy. This is what gives no bake banana pudding that soft, cloud-like texture people love.
Do not stir too hard. If you overmix, the pudding can turn dense and lose that light finish. If you want to make the dessert a little richer, you can chill the pudding base for 5 to 10 minutes before layering. That short rest also helps the flavor settle.
Fourth Step: Build the first layer
Spread a thin layer of the pudding mixture on the bottom of your dish. This helps the cookies stay in place. Then add a full layer of vanilla wafer cookies across the surface. Try to cover the dish as evenly as you can. If there are small gaps, break a few cookies to fit the empty spots.
Next, arrange a layer of thinly sliced bananas over the cookies. Use about half of your banana slices for the first layer. The bananas should be fresh, evenly sliced, and spread from edge to edge so every spoonful gets some fruit. This is where the dessert starts looking like the classic no bake banana pudding most of us remember from family tables.
Fifth Step: Add more pudding and repeat the layers
Spoon more pudding mixture over the banana layer and smooth it out gently. Add another layer of vanilla wafer cookies, followed by the remaining banana slices. Then top with the rest of the pudding mixture. You can make one thick layered dessert or repeat the pattern if your dish is deep enough. The more even the layers, the prettier the final dessert will look when you serve it.
If you are making this for a party, a clear trifle bowl works beautifully because everyone can see the layers. If you are serving family style, a simple glass baking dish works just fine. Either way, the dessert will taste great.
Sixth Step: Add the final toppings
Spread the last bit of pudding mixture on top and smooth it with a spatula. Place extra whipped topping or a few banana slices on the surface if you like. Sprinkle crushed vanilla wafers over the top for a little crunch. The garnish is optional, but it gives the simple no bake banana pudding a polished look.
For the freshest look, add the banana garnish just before serving so the slices stay bright.
Final Step: Chill before serving
Cover the dish tightly and refrigerate for at least 2 hours. If you have more time, overnight chilling gives even better texture because the cookies soften and the flavors blend together. Before serving, check that the pudding is fully set and scoopable. The dessert should be creamy, cool, and easy to spoon into bowls.
For the best texture, do not rush the chill time. This no bake banana pudding tastes best when it has rested long enough for the bananas, pudding, and cookies to work together. If you want a more classic dessert style, serve it cold straight from the refrigerator with a little extra wafer crunch on top.
If you want to compare versions, you can also look at this trusted classic banana pudding recipe for another take on the same family favorite.
Protein and Main Component Alternatives
Even though this recipe is built around instant vanilla pudding, whipped topping, bananas, and vanilla wafers, you still have room to make it fit your kitchen and your needs. Here are a few easy swaps if you need a different base or do not have one of the main items on hand.
Simple swaps for the pudding base
- Banana cream instant pudding: If you want stronger banana flavor, use banana cream pudding instead of vanilla. It gives the dessert a more pronounced banana taste.
- French vanilla pudding: This gives the dessert a richer, more bakery-style flavor while still keeping the simple no bake banana pudding feel.
- Dairy free pudding mix: If you need a dairy free version, choose a pudding mix that works with plant based milk.
Whipped topping alternatives
If you do not have whipped topping, you can use homemade whipped cream. Whip heavy cream with a little powdered sugar until soft peaks form, then fold it into the pudding. This works well if you want a fresher taste. For a dairy free version, coconut whipped topping is a good swap and adds a light coconut note.
Milk alternatives
You can use 2% milk for a lighter dessert or whole milk for a richer one. If you need a plant based version, oat milk or almond milk can work, but make sure the pudding mix you choose sets well with non dairy milk. Keep in mind that some substitutes may make the pudding a little softer.
Cookie alternatives
Vanilla wafers are the classic choice, but shortbread cookies, butter cookies, or gluten free vanilla cookies can work too. If you love a stronger cookie taste, Chessman style butter cookies add a rich twist. For a lighter finish, use fewer cookies and more bananas between the layers.
Vegetable, Sauce, and Seasoning Modifications
Even though this dessert does not use vegetables, sauce, or seasoning in the usual dinner sense, there are still plenty of ways to change the flavor profile. Small adjustments can make your no bake banana pudding feel more classic, more tropical, or a little richer.
Flavor additions
- Ground cinnamon: A tiny pinch on top adds warmth and works well with bananas.
- Nutmeg: Just a light dusting gives the pudding a cozy, old fashioned taste.
- Vanilla extract: A small splash can deepen the vanilla flavor if you want a more homemade taste.
- Crushed cookies on top: This adds texture and keeps the dessert from feeling too soft.
Fruit variations
If you want to change the fruit layer a bit, you can mix in sliced strawberries with the bananas or add a few blueberries on top for color. These swaps will change the flavor, but they still keep the dessert fresh and easy. For a tropical feel, some home cooks like a little shredded coconut on top.
Sauce ideas
You usually do not need a sauce for simple no bake banana pudding because the pudding base does the work. Still, a drizzle of caramel sauce can be lovely if you want a sweeter dessert. A light chocolate sauce can also work if your family likes the banana and chocolate combination. Add sauces lightly so the dessert stays balanced and not too heavy.
Seasoning tips
Keep seasonings subtle. The best no bake banana pudding usually shines because it is simple. Too many extras can cover up the banana flavor. If you want to serve this for a holiday table, a little cinnamon or nutmeg is often enough.
Mastering Simple No Bake Banana Pudding: Advanced Tips and Variations
Pro cooking techniques
For a smooth result, whisk the pudding mix and cold milk long enough to remove any lumps before folding in the whipped topping. Then fold gently instead of stirring hard. That keeps the pudding airy. Another helpful trick is to line your first cookie layer tightly so the dessert slices neatly later.
When layering bananas, slice them just before assembly. Bananas can brown quickly once cut, so working at the right time keeps the dessert looking fresh. If you want an extra neat presentation, wipe the inside edge of the dish after each layer with a clean paper towel.
Flavor variations
You can add a banana cream pudding mix for a stronger banana taste, or use chocolate wafer cookies if your family enjoys a banana and chocolate combination. Some readers also like a peanut butter drizzle on top, which gives the dessert a sweet and salty twist. A layer of crushed graham crackers can also replace part of the vanilla wafers for a softer, more pie-like feel.
Presentation tips
Serve the pudding in a glass bowl, individual cups, or a trifle dish to show off the layers. Top each serving with a banana slice, a little whipped topping, and a few crushed wafers. For parties, make small jars so guests can grab one and go. That works especially well for baby showers, picnics, and family reunions.
Make-ahead options
This is a great dessert for busy schedules because it can be made ahead. Prepare it up to 24 hours in advance, then keep it covered in the refrigerator. If you want the freshest banana topping, wait to garnish until right before serving. That way the top stays pretty and the slices do not brown too soon.
The best no bake banana pudding is the one that gives you creamy layers, soft cookies, and fresh banana flavor without any stress.
How to Store Simple No Bake Banana Pudding: Best Practices
Refrigeration
Store leftover simple no bake banana pudding in the refrigerator in a covered dish. It keeps well for 3 to 4 days, though the bananas may soften more over time. For the best texture, press plastic wrap gently against the surface before putting the lid on. This helps keep the top from drying out.
Freezing
Freezing is not the best choice for this dessert because the pudding and whipped topping can change texture once thawed. The bananas may also turn soft and watery. If you really need to freeze it, do so only in a pinch, and expect the texture to be less creamy after thawing. Fresh is always better for this recipe.
Reheating
This dessert is meant to be served cold, so reheating is not needed. In fact, heat will break down the pudding and make the bananas mushy. If the dessert has been in the fridge for a while and you want to soften it slightly, let it sit at room temperature for 10 to 15 minutes before serving.
Meal prep considerations
If you are making this for meal prep or a gathering, assemble the pudding base ahead of time and add the banana slices closer to serving. This helps keep the fruit fresh. You can also layer everything the day before and garnish right before serving. That gives you a make-ahead dessert that still looks lovely on the table.

FAQs: Frequently Asked Questions About Simple No Bake Banana Pudding
How much milk do I need for no bake banana pudding?
What kind of pudding mix is best for no bake banana pudding?
How many bananas do I need for simple no bake banana pudding?
Can I make no bake banana pudding ahead of time?
How long to chill no bake banana pudding and what cookies to use?
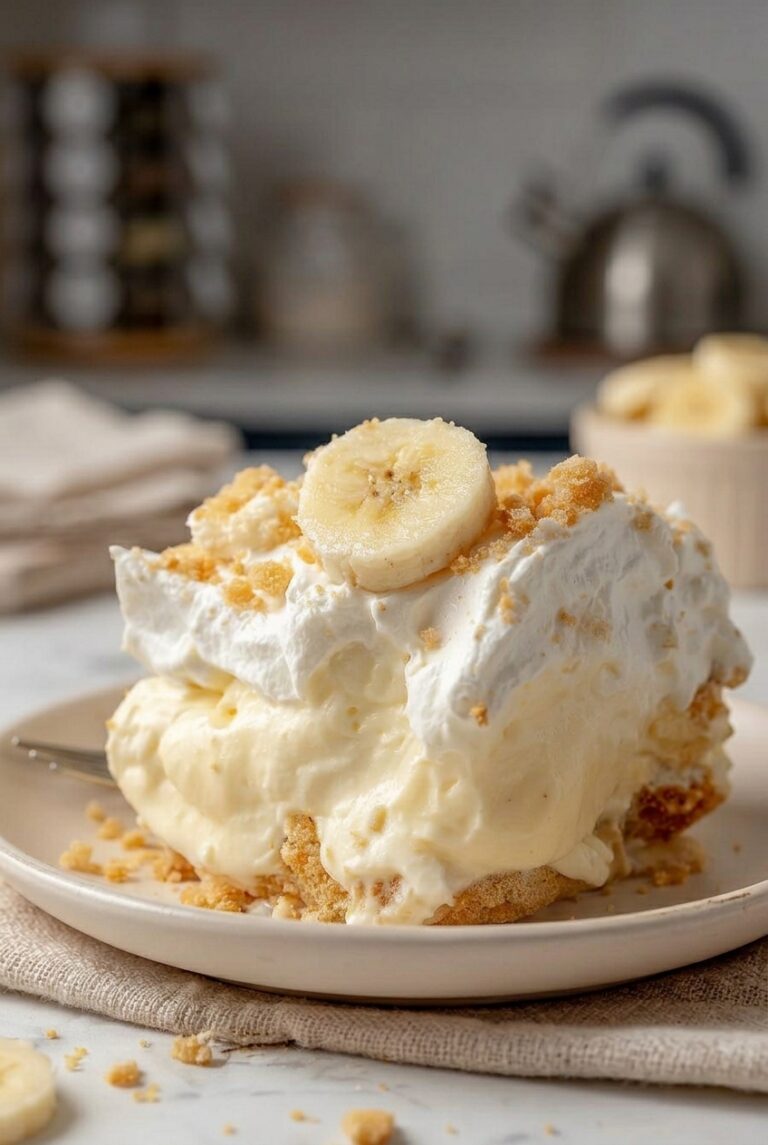
Simple No Bake Banana Pudding
🍌 Dive into nostalgic layers of silky vanilla pudding, ripe bananas, and crunchy wafers in this no-bake classic—pure comfort without the oven!
🍮 Quick-assembly, make-ahead favorite that’s creamy, crowd-pleasing, and effortlessly delicious for any gathering.
- Total Time: 4 hours 15 minutes
- Yield: 12 servings
Ingredients
– 5.1 ounces instant vanilla pudding mix for building the creamy pudding base
– 3 cups cold milk for helping the pudding set smoothly
– 3 large or 4 medium bananas for adding fresh flavor and soft layers
– 8 ounces whipped topping for making the dessert fluffy and light
– 1 box vanilla wafer cookies for creating the classic cookie layer
– Additional bananas for garnish if desired
Instructions
1-First Step: Gather and chill your ingredients Start by placing your 3 cups of cold milk in the refrigerator if it is not already cold. Cold milk matters because instant pudding thickens best when it is straight from the fridge. Slice your bananas right before layering so they stay fresh and bright. Also, let your whipped topping thaw if it is frozen, since it will fold into the pudding more smoothly when soft. Set out a large mixing bowl, a whisk, and a 9×13-inch dish or a trifle bowl. If you are feeding a smaller group, you can use individual dessert cups instead. This simple no bake banana pudding works well for casual family meals, church gatherings, potlucks, and even late night study breaks.
2-Second Step: Mix the pudding base In a large bowl, whisk together the 5.1 ounces of instant vanilla pudding mix and 3 cups of cold milk for about 2 minutes. Keep whisking until the mixture begins to thicken. The texture should look smooth and creamy, not watery. If you are using a stand mixer, keep the speed low so you do not splash the milk. For the best result, do not use warm milk. Warm milk can make the pudding less smooth and may keep it from setting the right way. If you want a lighter dessert, you can use 2% milk, though whole milk gives the richest flavor. This step is the heart of the simple no bake banana pudding, so take a minute to whisk until everything looks silky.
3-Third Step: Fold in the whipped topping Once the pudding has started to thicken, gently fold in the 8 ounces of whipped topping. Use a spatula and move slowly from the bottom of the bowl upward. The goal is to keep as much air in the mixture as possible so the pudding stays fluffy. This is what gives no bake banana pudding that soft, cloud-like texture people love. Do not stir too hard. If you overmix, the pudding can turn dense and lose that light finish. If you want to make the dessert a little richer, you can chill the pudding base for 5 to 10 minutes before layering. That short rest also helps the flavor settle.
4-Fourth Step: Build the first layer Spread a thin layer of the pudding mixture on the bottom of your dish. This helps the cookies stay in place. Then add a full layer of vanilla wafer cookies across the surface. Try to cover the dish as evenly as you can. If there are small gaps, break a few cookies to fit the empty spots. Next, arrange a layer of thinly sliced bananas over the cookies. Use about half of your banana slices for the first layer. The bananas should be fresh, evenly sliced, and spread from edge to edge so every spoonful gets some fruit. This is where the dessert starts looking like the classic no bake banana pudding most of us remember from family tables.
5-Fifth Step: Add more pudding and repeat the layers Spoon more pudding mixture over the banana layer and smooth it out gently. Add another layer of vanilla wafer cookies, followed by the remaining banana slices. Then top with the rest of the pudding mixture. You can make one thick layered dessert or repeat the pattern if your dish is deep enough. The more even the layers, the prettier the final dessert will look when you serve it. If you are making this for a party, a clear trifle bowl works beautifully because everyone can see the layers. If you are serving family style, a simple glass baking dish works just fine. Either way, the dessert will taste great.
6-Sixth Step: Add the final toppings Spread the last bit of pudding mixture on top and smooth it with a spatula. Place extra whipped topping or a few banana slices on the surface if you like. Sprinkle crushed vanilla wafers over the top for a little crunch. The garnish is optional, but it gives the simple no bake banana pudding a polished look. For the freshest look, add the banana garnish just before serving so the slices stay bright.
7-Final Step: Chill before serving Cover the dish tightly and refrigerate for at least 2 hours. If you have more time, overnight chilling gives even better texture because the cookies soften and the flavors blend together. Before serving, check that the pudding is fully set and scoopable. The dessert should be creamy, cool, and easy to spoon into bowls. For the best texture, do not rush the chill time. This no bake banana pudding tastes best when it has rested long enough for the bananas, pudding, and cookies to work together. If you want a more classic dessert style, serve it cold straight from the refrigerator with a little extra wafer crunch on top. If you want to compare versions, you can also look at this trusted classic banana pudding recipe for another take on the same family favorite.
Last Step:
Please leave a rating and comment letting us know how you liked this recipe! This helps our business to thrive and continue providing free, high-quality recipes for you.Notes
🍌 Use ripe but firm bananas to avoid browning; slice just before assembly and pat dry if needed.
❄️ Chill for at least 4 hours or overnight for the perfect texture where wafers soften just right.
🔄 For a twist, add a layer of sliced strawberries or use chocolate wafers for variety.
- Prep Time: 15 minutes
- Chill: 4 hours
- Category: Dessert
- Method: No-Bake
- Cuisine: American
- Diet: Vegetarian
Nutrition
- Serving Size: 1/12 recipe
- Calories: 280 kcal
- Sugar: 30 g
- Sodium: 300 mg
- Fat: 10 g
- Saturated Fat: 6 g
- Unsaturated Fat: 3 g
- Trans Fat: 0 g
- Carbohydrates: 45 g
- Fiber: 1 g
- Protein: 4 g
- Cholesterol: 15 mg





