Ingredients
– 18 jumbo marshmallows These form the base of your treats, providing a soft, chewy texture that’s easy for dipping and decorating, ideal for both kids and adults.
– 1 bag green chocolate melts Used for coating Frankenstein marshmallows, this adds a vibrant color and smooth finish that melts evenly for a professional look.
– 1 bag orange chocolate melts Perfect for Jack o’ Lantern designs, offering a bright hue and creamy taste that helps create the pumpkin effect.
– Black jimmies (sprinkles) as needed Sprinkled on top for hair on Frankenstein marshmallows, they add a fun crunch and spooky detail without overwhelming the flavor.
– Edible eyes as needed These small accents bring faces to life on your marshmallows, making the treats visually engaging and easy to apply while the chocolate is warm.
– Edible pens as needed Essential for drawing details like mouths and scars, they provide precision for custom designs and dry quickly for a neat finish.
– Green gummy candy (spearmint leaves cut for pumpkin stalks) as needed Cut into small pieces to serve as stalks on Jack o’ Lantern marshmallows, adding a chewy element and realistic touch.
– Red and black edible pens as needed Used for extra details on faces, these help refine your designs with color variety and ensure everything looks just right.
Instructions
1-First Step: Gather and Prepare Your Materials Before you begin, lay out all your ingredients and tools on a clean surface. This includes 18 jumbo marshmallows, chocolate melts, sprinkles, edible eyes, pens, and lollipop sticks. Having everything ready, known as mise en place, helps the process go smoothly and prevents any rushing, which is especially helpful for busy parents. If you’re adapting for dietary needs, check substitutes now to keep things seamless.
2-Second Step: Melt the Chocolate Melts Start by melting the chocolate melts in the microwave at 50% power in 30-second intervals until smooth, stirring between each interval to avoid burning. This typically takes 1-2 minutes, ensuring a glossy coating for your marshmallows. Use green melts for Frankenstein and orange for Jack o’ Lantern varieties; this step is crucial for that perfect base, and it’s a great moment for kids to learn safe microwave use. For a vegan twist, make sure your melts are dairy-free to fit different preferences.
3-Third Step: Add the Lollipop Sticks Place the marshmallows onto long lollipop sticks, inserting them about halfway for stability. This makes handling easier during dipping and decorating, turning your treats into fun pops. If you’re worried about them slipping, a gentle twist helps secure them, and this step adapts well for gluten-free options by choosing appropriate sticks. It’s a quick action that sets the stage for creativity.
4-Fourth Step: Dip and Smooth the Marshmallows Dip each marshmallow into the melted chocolate, fully coating it, and use a spatula to smooth the surface for an even finish. For Frankenstein marshmallows, do this with green melts; for Jack o’ Lanterns, use orange. This step takes just a few minutes per treat and allows for personalization, like leaving some stick exposed for the pumpkin stalk. If you’re making low-calorie versions, use less chocolate to cut back on sugar while keeping the fun intact.
5-Fifth Step: Add Decorations While Warm For Frankenstein marshmallows, dip the top into black sprinkles right away for hair, then add edible eyes before the chocolate sets. Let them cool, then use an edible pen to draw eyebrows, mouth, and a scar. This ensures decorations stick well, and working quickly makes it enjoyable. Similarly, for Jack o’ Lanterns, add edible eyes while warm, let set, draw the face, and attach green gummy candy as a stalk. Adapt by using different colors for unique variations based on dietary needs.
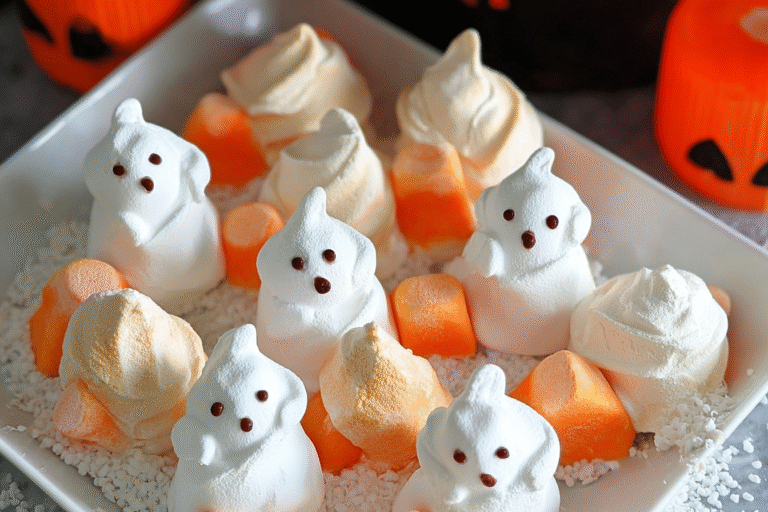
6-Sixth Step: Handle Ghost Marshmallows For ghost marshmallows, dip in white chocolate melts or simply draw faces directly on the marshmallows after they cool using edible pens. This offers a simple option if you’re short on time, and it’s versatile for all ages. Make sure to let everything set properly for the best texture, adapting with plant-based alternatives if needed. These steps build on the recipe’s core, letting you express creativity.
7-Final Step: Let Them Set and Serve Once decorated, stand the marshmallows upright to dry using cups or mugs, then store or serve immediately. Each serving is about 1 marshmallow with 34 calories, making it a light treat for parties. Cool for a few minutes to firm up, and consider making extras for tasty leftovers. This recipe’s adaptability shines here, perfect for food enthusiasts looking to tweak flavors or presentations.
Last Step:
Please leave a rating and comment letting us know how you liked this recipe! This helps our business to thrive and continue providing free, high-quality recipes for you.Notes
🎯 Work on one marshmallow at a time, as the chocolate dries quickly.
🥄 Use a spatula to smooth the chocolate coating for a neat finish.
❄️ These treats can be made a day in advance and stored covered at room temperature or refrigerated based on climate conditions.
- Prep Time: 30 minutes
- Category: Snack
- Method: Dipping and Decorating
- Cuisine: American
- Diet: Vegetarian
Nutrition
- Serving Size: 1 marshmallow
- Calories: 34 kcal
- Sugar: 6g
- Sodium: 6mg
- Carbohydrates: 9g