Ingredients
– 1 cup graham cracker crumbs – Provides the classic crunchy base and subtle sweetness
– 2 tbsp melted butter – Binds the crust together and adds richness
– 8 oz cream cheese (softened) – Creates the creamy, tangy cheesecake filling
– 1/2 cup powdered sugar – Sweetens the cheesecake layer without graininess
– 1 tsp vanilla extract – Enhances overall flavor depth
– 1 cup whipped topping – Lightens the texture and makes the filling fluffy
– 1/2 cup lemon curd – Provides the signature tangy citrus topping
– Fresh lemon zest – Optional garnish for extra citrus aroma
– Additional whipped cream – Optional topping for presentation
– 3 egg yolks – Creates the silky smooth texture
– 1/3 cup sugar – Sweetens and balances the acidity
– 1/4 cup lemon juice – Provides the signature tangy flavor
– 2 tbsp butter – Adds richness and smoothness
– 1 tsp lemon zest – Intensifies the lemon flavor
Instructions
1-First Step: Preparation and Mise en Place Begin by gathering all your ingredients and equipment. Clear sufficient counter space and ensure you have 12 small dessert cups, glasses, or ramekins ready. If making homemade lemon curd, prepare this first as it needs time to cool completely before assembling the cups. For the crust, crush 1 cup of graham crackers into fine crumbs using a food processor or by placing them in a sealed bag and crushing with a rolling pin. Melt 2 tablespoons of butter and set aside. Take your cream cheese out of the refrigerator about 30 minutes before starting to ensure it reaches room temperature for smooth mixing.
2-Second Step: Creating the Crust In a medium bowl, combine the graham cracker crumbs with the melted butter. Mix thoroughly until all crumbs are evenly moistened. The mixture should hold together when squeezed but shouldn’t be wet or soggy. Spoon approximately one tablespoon of the crust mixture into each of your 12 serving cups. Using the back of a small spoon or a mini tart tamper, press the crumbs firmly and evenly into the bottom of each cup to create a solid base layer. Place the cups in the refrigerator to chill while you prepare the filling. This step helps the crust set and makes assembly easier later.
3-Third Step: Making the Cheesecake Filling In a large mixing bowl, beat the softened cream cheese with an electric mixer until smooth and creamy, about 2-3 minutes. Add the powdered sugar and vanilla extract, continuing to mix until fully incorporated and smooth. Gently fold in the whipped topping using a rubber spatula, taking care not to deflate the mixture too much. The filling should be light, fluffy, and well-blended but still maintain some airiness. For dietary modifications, such as the vegan version using coconut cream, follow the same process but note that the texture may vary slightly based on your substitutions.
4-Fourth Step: Assembling the Cups Remove the crust-filled cups from the refrigerator. Transfer the cheesecake filling to a piping bag fitted with a large star tip or simply spoon it into the cups over the crust layer. Fill each cup about three-quarters full, leaving room for the lemon curd topping. Gently tap the cups on the counter to settle the filling and remove any air bubbles. Return the cups to the refrigerator while you prepare the lemon curd topping. If using store-bought lemon curd, simply transfer it to a piping bag or small spoon for application.
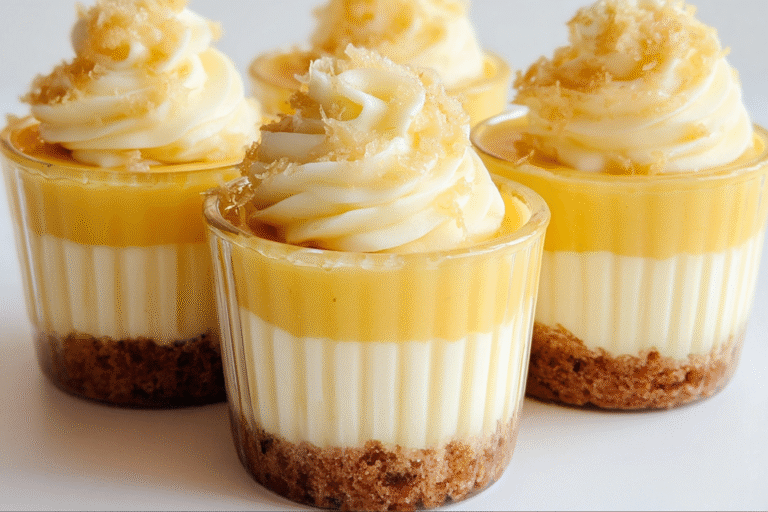
5-Fifth Step: Adding the Lemon Curd Layer Whether using homemade or store-bought lemon curd, add approximately 1-2 tablespoons to the top of each cheesecake-filled cup. You can pipe it in the center, spread it evenly across the top, or create artistic swirls depending on your preference. The bright yellow curd creates a beautiful contrast against the creamy white cheesecake layer. For a marbled effect, gently swirl a small amount of lemon curd into the cheesecake layer before adding the remaining curd on top. Be careful not to disturb the cheesecake layer too much while adding the curd.
6-Final Step: Chilling and Serving Refrigerate the assembled lemon curd cheesecake dessert cups for at least 2 hours to allow them to set properly. The cheesecake layer will firm up, and the flavors will meld together beautifully. For the best results, chill for 4 hours or overnight. Just before serving, garnish with additional whipped cream, a sprinkle of fresh lemon zest, or a few fresh berries if desired. These no-bake treats are best served chilled but can sit at room temperature for up to 30 minutes before serving. Enjoy your beautiful and delicious creation!
Last Step:
Please leave a rating and comment letting us know how you liked this recipe! This helps our business to thrive and continue providing free, high-quality recipes for you.Notes
🍋 Use fresh lemons for zest/juice—intensifies bright flavor.
🧀 Pipe cheesecake layer using zip-top bag—neat professional swirls.
❄️ Make ahead up to 2 days; curd sets firmer chilled.
- Prep Time: 20 minutes
- Chill: 2 hours
- Category: Dessert
- Method: No Bake
- Cuisine: American
- Diet: Vegetarian
Nutrition
- Serving Size: 1 cup
- Calories: 320 kcal
- Sugar: 22g
- Sodium: 260mg
- Fat: 22g
- Saturated Fat: 12g
- Unsaturated Fat: 8g
- Trans Fat: 0g
- Carbohydrates: 28g
- Fiber: 1g
- Protein: 4g
- Cholesterol: 75mg