

Why You’ll Love This No Bake Banana Cream Pudding Cheesecake
No Bake Banana Cream Pudding Cheesecake is a flavorful no-bake dessert that combines two classic favorites: creamy cheesecake vibes and the comforting taste of banana pudding. It is the kind of dessert that looks impressive, but it does not demand oven time or advanced baking skills.
- Ease of preparation: With a simple mix-and-fold method, you can go from ingredients to a set cheesecake in minutes, then let the fridge do the rest.
- Distinctive flavor: The creamy vanilla pudding layer plus fresh banana slices gives you a sweet, tangy, and lightly nostalgic bite.
- Versatility: You can adapt sweetness levels and dairy choices, making it easier to fit different preferences and schedules.
- Family-friendly: It is approachable for home cooks, and it is fun to assemble with kids or for a weekend dessert night.
Quick tip: If you want the best looking topping, plan to add the sliced bananas right before serving to keep them fresh and bright.
If you enjoy easy no-bake desserts, you may also like this no-bake energy bites recipe for another quick kitchen win.
Jump to:
- Why You’ll Love This No Bake Banana Cream Pudding Cheesecake
- Essential Ingredients for No Bake Banana Cream Pudding Cheesecake
- Special Dietary Options
- How to Prepare the Perfect No Bake Banana Cream Pudding Cheesecake: Step-by-Step Guide
- Before You Start (Mise en Place)
- Step-by-Step Instructions
- Assembly Timing and Chilling
- What the Layers Should Look Like
- Protein and Main Component Alternatives
- Main component swaps for the filling
- Sweetness alternatives
- Vegetable, Sauce, and Seasoning Modifications
- Banana and topping modifications
- Seasoning and flavor additions
- Mastering No Bake Banana Cream Pudding Cheesecake: Advanced Tips and Variations
- Pro cooking techniques
- Flavor variations to try
- Presentation tips and make-ahead strategy
- How to Store No Bake Banana Cream Pudding Cheesecake: Best Practices
- Refrigeration
- Freezing
- Reheating
- FAQs: Frequently Asked Questions About No Bake Banana Cream Pudding Cheesecake
- Can I make no bake banana cream pudding cheesecake ahead of time?
- What can I substitute for heavy cream in no bake banana cream pudding cheesecake?
- Can I use sweetened condensed milk instead of sugar in no bake banana cream pudding cheesecake?
- How long does no bake banana cream pudding cheesecake last in the fridge?
- Can you freeze no bake banana cream pudding cheesecake?
- No Bake Banana Cream Pudding Cheesecake
- Ingredients
- Instructions
- Last Step:
- Notes
- Nutrition
- Did you make this recipe?
Essential Ingredients for No Bake Banana Cream Pudding Cheesecake
This No Bake Banana Pudding Cheesecake Recipe uses straightforward pantry staples and a few key dairy ingredients to create that classic layered texture. Below is everything you need, with exact measurements.
- 1 graham cracker crust – forms the sweet, crunchy base
- 8 oz softened cream cheese – gives the cheesecake filling its creamy structure
- ⅓ cup sugar – sweetens and balances the dairy flavors
- 1 cup heavy cream – adds richness and helps the filling hold a fluffy texture
- 1 teaspoon vanilla extract – boosts warm, bakery-style flavor
- 3.4 oz package instant vanilla pudding – provides the banana pudding flavor and helps set the filling
- 1 cup milk – activates the instant pudding for a smooth layer
- 2 sliced bananas – adds fresh fruit layers and natural sweetness
- 20-30 vanilla wafers – used for layering and a patterned top
Special Dietary Options
Most people make this dessert with classic ingredients for the best sliceable texture. That said, there are a couple of practical swaps you can try based on what you have at home.
- Lower dairy swap (lighter feel): Substitute heavy cream with half and half using a 1:1 ratio.
- Sweetness swap: Use sweetened condensed milk in place of sugar and some of the milk (details in the tips section).
- Note about fruit: Keep bananas fresh and add them at serving time to avoid browning.
Vegan and gluten-free versions are not provided in the base recipe because the exact texture depends on cream cheese, heavy cream, and the graham cracker crust. If you want, tell me what substitutions you prefer and I can help adapt it.
How to Prepare the Perfect No Bake Banana Cream Pudding Cheesecake: Step-by-Step Guide
This recipe is built for busy days, school nights, and potlucks. The main idea is simple: make a smooth cream cheese mixture, stir in pudding, then assemble in layers so every forkful tastes balanced.
Before You Start (Mise en Place)
Set out your ingredients and equipment so the process stays calm and quick. You will need a mixing bowl, a hand mixer or stand mixer, and a spoon or spatula for folding. Keep the crust on a plate or in the springform pan it came in.
Also, measure your pudding and milk so you can move to assembly without rushing. Finally, plan for chilling, because this cheesecake needs time to firm up.
Step-by-Step Instructions
First Step: Beat the 8 oz softened cream cheese until smooth. Then add the ⅓ cup sugar and mix until combined.
Second Step: Add the 1 cup heavy cream and 1 teaspoon vanilla extract. Beat until you reach medium peaks so the filling stays airy.
Third Step: In a separate bowl, mix the 3.4 oz package instant vanilla pudding with the 1 cup milk. Refrigerate for 3 to 5 minutes so it thickens slightly.
Fourth Step: Fold the pudding mixture into the cream cheese mixture. Mix gently until fully combined, then stop. Overmixing can make the filling less light.
Final Step: Assemble and chill. Pour half the filling into the crust. Layer with banana slices and vanilla wafers, then add the remaining filling on top and smooth the surface. Top with vanilla wafers in a pattern you like. Refrigerate for at least 3 hours before serving. Add banana slices when serving to prevent browning.
Assembly Timing and Chilling
Here is a helpful quick timeline for your kitchen:
| Stage | Time |
|---|---|
| Prep and mixing | 15 minutes |
| Chill | 3 hours (minimum) |
| Total | About 3 hours 15 minutes |
It is totally normal if it needs a little longer depending on your fridge temperature and how cold your cream cheese was at the start.
What the Layers Should Look Like
When you pour in the filling and add wafers and banana slices, you are building contrast. The crust stays stable at the bottom, the filling becomes creamy and sliceable, and the topping adds crunch and color.
If you want to serve clean slices, chill the cheesecake fully before cutting. When you are ready, run a knife under warm water, wipe, and slice again for smoother edges.
Protein and Main Component Alternatives
Cheesecake filling relies on creamy dairy for texture. But you can still adjust based on availability while keeping the no-bake method.
Main component swaps for the filling
- Cream cheese swap: Use regular softened cream cheese for best set. If you use a lower-fat version, the cheesecake may be softer after chilling.
- Heavy cream swap: Substitute heavy cream with half and half at a 1:1 ratio for a lighter texture.
- Flavor-forward pudding swap: Keep instant vanilla pudding for the classic flavor. If you change flavors, the banana-pudding vibe will shift.
Sweetness alternatives
- Sweetened condensed milk: Replace sugar and part of the milk with 1/2 cup sweetened condensed milk plus 1/4 cup regular milk. Stir it into the cheesecake or pudding layer during mixing for even sweetness.
- Reduced sweetness: If you want less sugar, start by slightly reducing the sugar and taste the pudding mixture before combining. Chilling helps flavors blend.
For another easy family recipe idea, check out mini muffin pancake bites if you want something quick to pair with a dessert night.
Vegetable, Sauce, and Seasoning Modifications
While this recipe is not built around vegetables, the “freshness factor” comes from your fruit choices. Still, you can absolutely modify flavor and topping details without changing the core no-bake method.
Banana and topping modifications
- Banana freshness: Slice bananas right before serving to prevent browning and keep them looking bright.
- Optional topping texture: If you like extra crunch, add a few extra vanilla wafers crushed lightly and sprinkled on top after the cheesecake is chilled.
- Citrus lift: If your bananas taste very mild, add a tiny splash of lemon juice to the banana slices right before serving. This can help with flavor and color.
Seasoning and flavor additions
- Vanilla intensity: You can increase vanilla extract slightly for a more pronounced bakery flavor.
- Chocolate lovers: For a fun variation, add a thin layer of chocolate syrup in the wafer layer. Keep it light so the banana pudding flavor still shines.
- Spice note: A pinch of cinnamon on the banana slices can add warmth, especially if your bananas are less sweet.
If you are curious about the nutritional benefits of bananas, this external read from Healthline on bananas can be a helpful reference.
Mastering No Bake Banana Cream Pudding Cheesecake: Advanced Tips and Variations
Once you nail the basics, you will want this cheesecake to turn out perfectly every time. Here are the practical tips that make the biggest difference, plus a few fun ways to customize it.
Pro cooking techniques
- Use room temperature cream cheese: This prevents lumps and gives you a smooth, creamy base.
- Chill pudding briefly: Refrigerate the pudding and milk mixture for 3 to 5 minutes so it folds in easier.
- Beat to medium peaks: If you go too stiff, the filling can feel heavy; too soft and it may not set as nicely.
- Warm slicing method: For neat slices, warm the knife and wipe between cuts.
Flavor variations to try
- Sweetened condensed milk version: Use 1/2 cup sweetened condensed milk plus 1/4 cup regular milk to replace sugar and part of the milk.
- Lighter version: Swap heavy cream with half and half for a less rich feel.
- Extra banana layer: If your bananas are large, you can add one additional slice layer inside, but keep the top bananas for serving time.
Presentation tips and make-ahead strategy
This is a dessert that looks great when you plan ahead. You can even turn it into a “kids help” day because assembling the layers is simple.
- Make-ahead: Can be made a day ahead without bananas on top to save time.
- Kid-friendly activity: Let children help layer wafers and arrange components for a fun, educational kitchen moment.
- Banana topping timing: Add banana slices fresh at serving to prevent browning.
For more no-bake cheesecake guidance, you can also reference this classic overview from Sally’s Baking Addiction no-bake cheesecake guide.
How to Store No Bake Banana Cream Pudding Cheesecake: Best Practices
Because this recipe uses dairy and fruit, storage matters. The good news is that it chills well and tastes even better after the flavors settle in.
Refrigeration
- Store in an airtight container or cover tightly with plastic wrap.
- Keep it chilled at all times below 40°F (4°C).
- Enjoy within 3 to 5 days for best texture and flavor.
- Bananas on top may brown after day 1, so consider adding fresh slices each serving.
Freezing
- Freeze up to 2 months.
- Skip adding fresh bananas until after thawing to avoid mushiness.
- Wrap tightly in plastic wrap, then foil, and place in a freezer-safe bag.
Reheating
No reheating is needed. Serve cold. For the best sliceable texture after thawing, let it thaw overnight in the fridge (about 8 to 12 hours).
Meal prep note: Portion into individual servings before freezing so you can grab and thaw only what you need.

FAQs: Frequently Asked Questions About No Bake Banana Cream Pudding Cheesecake
Can I make no bake banana cream pudding cheesecake ahead of time?
What can I substitute for heavy cream in no bake banana cream pudding cheesecake?
Can I use sweetened condensed milk instead of sugar in no bake banana cream pudding cheesecake?
How long does no bake banana cream pudding cheesecake last in the fridge?
Can you freeze no bake banana cream pudding cheesecake?
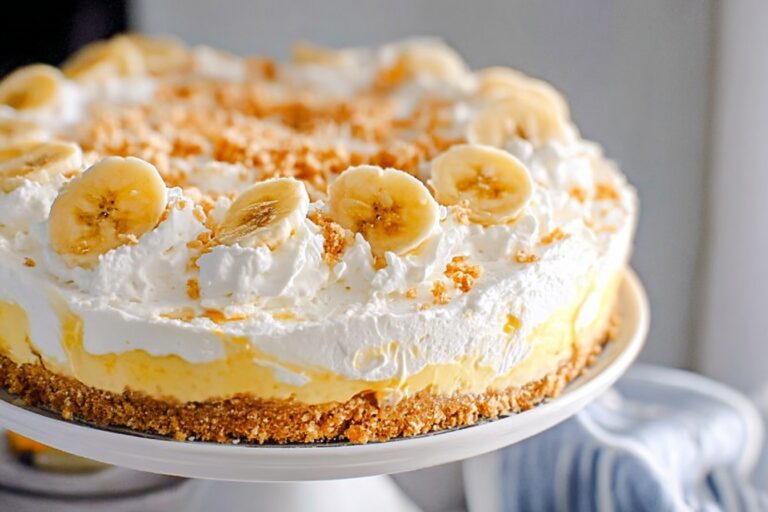
No Bake Banana Cream Pudding Cheesecake
🍌 Dive into this creamy No Bake Banana Pudding Cheesecake blending cheesecake and banana pudding for ultimate indulgence without the oven!
🧁 Perfect make-ahead dessert with layers of wafers, bananas, and fluffy filling – ideal for parties or sweet cravings.
- Total Time: 3 hours 15 minutes
- Yield: 8 servings
Ingredients
– 1 graham cracker crust – forms the sweet, crunchy base
– 8 oz softened cream cheese – gives the cheesecake filling its creamy structure
– ⅓ cup sugar – sweetens and balances the dairy flavors
– 1 cup heavy cream – adds richness and helps the filling hold a fluffy texture
– 1 teaspoon vanilla extract – boosts warm, bakery-style flavor
– 3.4 oz package instant vanilla pudding – provides the banana pudding flavor and helps set the filling
– 1 cup milk – activates the instant pudding for a smooth layer
– 2 sliced bananas – adds fresh fruit layers and natural sweetness
– 20-30 vanilla wafers – used for layering and a patterned top
Instructions
1-First Step: Beat the 8 oz softened cream cheese until smooth. Then add the ⅓ cup sugar and mix until combined.
2-Second Step: Add the 1 cup heavy cream and 1 teaspoon vanilla extract. Beat until you reach medium peaks so the filling stays airy.
3-Third Step: In a separate bowl, mix the 3.4 oz package instant vanilla pudding with the 1 cup milk. Refrigerate for 3 to 5 minutes so it thickens slightly.
4-Fourth Step: Fold the pudding mixture into the cream cheese mixture. Mix gently until fully combined, then stop. Overmixing can make the filling less light.
5-Final Step: Assemble and chill. Pour half the filling into the crust. Layer with banana slices and vanilla wafers, then add the remaining filling on top and smooth the surface. Top with vanilla wafers in a pattern you like. Refrigerate for at least 3 hours before serving. Add banana slices when serving to prevent browning.
Last Step:
Please leave a rating and comment letting us know how you liked this recipe! This helps our business to thrive and continue providing free, high-quality recipes for you.Notes
⏰ Make ahead up to a day without topping bananas to save time and ensure freshness.
🥛 Substitute heavy cream with half-and-half for a lighter version, adjusting sweetness as needed.
🍌 Add fresh banana slices right before serving to keep them vibrant and prevent browning.
- Prep Time: 15 minutes
- Chill Time: 3 hours
- Category: Dessert
- Method: No Bake
- Cuisine: American
Nutrition
- Serving Size: 1 slice
- Calories: 432 kcal
- Sugar: 33g
- Sodium: 460mg
- Fat: 20g
- Saturated Fat: 10g
- Carbohydrates: 55g
- Fiber: 1g
- Protein: 8g
- Cholesterol: 47mg





